|
|
Post by sdboers on Mar 12, 2015 17:53:44 GMT -5
G'day, Ever since starting up my aquarium I've been toying with the idea of implementing a continuous water change. I think it's beneficial to the fish, and I know it's beneficial to my back not having to cart off pails of waste water! My goals for the project were: - As DIY as possible
- As affordable as possible
- As fully automatic as possible
I needed to create solutions for the following areas: - 1) Getting the fresh water into the tank
- 2) Getting the waste water out of the tank
- 3) Getting the discharged water off to the septic system
- 4) Have a way to clean the aquarium (vacuum waste) without removing water from the tank
1) Getting fresh water into the tank
I could not tap into a water source near the tank as it was important to take the water from before it went through the water softener. To keep the cost low and the installation simple, I went with 1/2" PEX pipe. A 100 foot roll cost me $25. Since I know I'll make use of it for other household projects, I also picked up a crimper and set of rings for the PEX fittings for about $40. I was feeling uber-lazy, so I also opted for a sharkbite fitting (solderless connector) to tap into the main 3/4" copper line. I added a shutoff valve so I could easily disable the new feed. I fished the PEX pipe through the ceiling and dropped it down next to the 2 tanks.
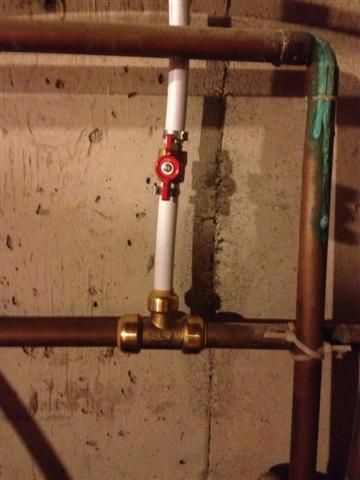
The inflow of water is done through drip irrigation fittings available at Home Depot and many other places. I put another shutoff valve on this end of the PEX as well as a 3/4" threaded connector. Drip irrigation runs on fixed 25psi pressure, so a 25psi regulator is screwed onto the end of the PEX. From there I needed a 3/4" male adapter to a 1/2" female adapter. The drip irrigation manifold I got (2 port) screws into that adapter (1 port for each tank).  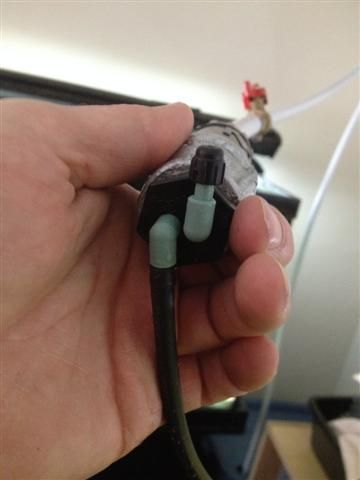
Last two pieces of the inflow are the black tubing ($15 for 100 feet) and the drip/spray nozzles (About $5 for 2). The nozzles are adjustable to give anywhere from 0 to about 15 gallons per hour. 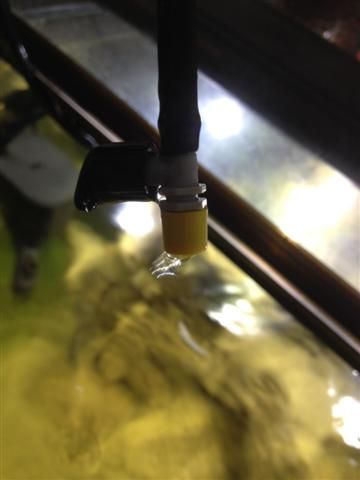
2) Getting the waster water out of the tank I hate to point of the obvious, but now that there is a continuous supply of fresh water going into the tank, unless we start removing water at an equal rate - the tank will eventually overflow. Overflow... hmmm - there's an idea. See the thread on a DIY PVC Overflow located here: everythingaquatic.proboards.com/thread/3836/diy-pvc-overflow . A 20 foot length of sump pump hose cost about $6 and was more than enough to run from the PVC overflow to the collection bin.
3) Getting the discharge water to the septic My tank happens to be located in the basement, so I can't rely on gravity to get the discharged water off to waste. I needed a way to collect it and then pump it off for disposal. To that end I simply used a large rubbermaid storage tote. A garbage pail would have worked just as well. I already had a submersible utility pump that I used, and a float switch for it cost me about $30. The lid was drilled to accommodate the plumbing and away we go... 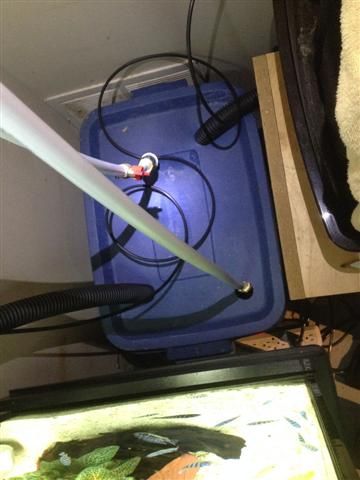 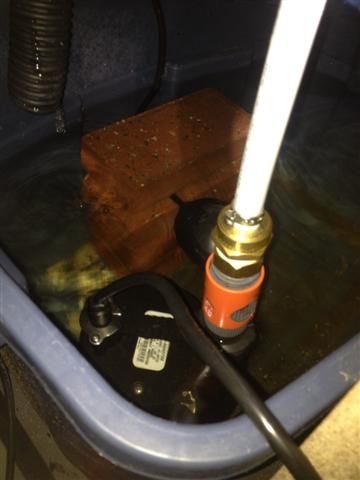
The two large black hoses are the drains from each tank. The white PEX that goes through the hole is connected to the submersible pump and goes off to the household sewage line. The small back hose is the fresh water feed going to the 2 tanks. On the inside view of the rubbermaid, you'll see I've simply placed bricks to hold the float switch in position. In this pic - it's just about ready to trip the switch and empty the container.
4) Cleaning the tank And the last thing to do (and the first thing I actually did) was to create a way to clean the tank since I won't be siphoning off sludge anymore. To that end I created a powered aquarium vacuum which is covered here: everythingaquatic.proboards.com/thread/3828/diy-powered-aquarium-vacuum . This allows me to quickly and easily clean the bottom of the tank without removing any water.
So - what's left? Thoughts to round out the system include: - Mesh cover over the overflow pipes to discourage suicidal fish
- Float valves on the inflow tubes for safety if the overflow stops working
- Adding a powered shutoff valve to the inflow that shuts off when the power goes out
Sean
|
|
|
|
Post by Carl on Mar 13, 2015 11:52:12 GMT -5
Excellent Job! This would make an excellent Everything Aquatic blog post when combined with your other thread!  www.everything-aquatic.com/ www.everything-aquatic.com/Carl |
|
|
|
Post by sdboers on Mar 13, 2015 12:55:04 GMT -5
I have no issues with that. What would you need me to do? BTW - I'm seriously considering a DIY FSB for my next project. Any words of wisdom to pass along? Don't know when I'd actually get to it, but I've been toying with that idea as well...  Sean. |
|
|
|
Post by angelminx on Mar 13, 2015 14:27:39 GMT -5
Too bad I'm not handy/mechanically inclined--that and the fact that I live in an apartment--I would LOVE to be able to do the same thing! Great pics, too!
Angelminx
|
|
|
|
Post by devonjohnsgard on Mar 13, 2015 16:44:31 GMT -5
I have no issues with that. What would you need me to do? BTW - I'm seriously considering a DIY FSB for my next project. Any words of wisdom to pass along? Don't know when I'd actually get to it, but I've been toying with that idea as well... Sean. The outtake not sucking up sand I think will be the most challenging part. |
|
|
|
Post by devonjohnsgard on Mar 13, 2015 16:45:09 GMT -5
Awesome project. Could save you a lot of effort in the long run.
|
|
|
|
Post by sdboers on Mar 13, 2015 18:40:34 GMT -5
The outtake not sucking up sand I think will be the most challenging part. Correct me if I'm wrong, but isn't that more a function of flow than anything? Too little flow = no fluidization. Too much flow = sand blowing out the top? With either a variable speed pump, or a ball valve to control flow, I'm thinking that should be able to be kept under control? I'm toying with design ideas for an internal FSB - which obviously doesn't need to be watertight - just has to keep fish out. Or a closed version for external use. Acrylic tubes are stupid expensive, so my current thought process is to use a straight sided vase. These are available in all sizes at ridiculously cheap prices. I'm thinking either 4" OD or 6" OD. The internal tank version would simply need a mesh cover to allow water to flow out - or be higher than the water level of the tank. The external version would need a sealing cap which can be drilled. A little more complicated, but not insurmountable. Sean. |
|
|
|
Post by sdboers on Mar 13, 2015 19:00:10 GMT -5
Too bad I'm not handy/mechanically inclined--that and the fact that I live in an apartment--I would LOVE to be able to do the same thing! Great pics, too! Angelminx Thanks! I'm sure you are more than handy enough to accomplish this if you wanted. Plumbing isn't what it used to be with having to solder copper - that's what used to scare most people away. PEX is as easy as squeezing a hand grip. If there were any details that I left out that would be helpful - I'd be happy to fill in the gaps! For an apartment setup, you could always go with a more localized setup - rather than tapping into the plumbing. If you have room somewhere close for 2 containers of equal size, you can set this up anywhere. Use one as your fresh water supply, and one as your discharge. Filling the fresh water container is like filling your tank, emptying your discharge container is like draining water off the tank - same process! Still use the overflow to the discharge, but use a dosing pump on a timer for the infeed. With the 2 containers the same size - you are guaranteed never to overflow your discharge container. Sean. |
|
|
|
Post by sdboers on Mar 13, 2015 19:03:37 GMT -5
By the way folks - just a quick note on me, so no one takes offense. You'll never see me "like" a post. That's not because I don't like them... I've seen too many people get offended over the years because someone liked one post and not another - intentional or otherwise. Rather than miss "liking" one - I simply avoid "liking" any of them! Even though I like them... errr... Does that make sense?
Sean.
|
|
|
|
Post by angelminx on Mar 13, 2015 22:44:14 GMT -5
[Previous post]: Yup ! [Post before that]: Unfortunately I don't have room for 2 containers nearby; My tanks are in the bedroom, and my holding container is in the living room--between the wall (the shortest one) and the end table and (on that same wall) next to the recliner closest to the bedroom. It's easily accessed there for water changes, and out of the way at the same time. [My other walls may be longer, but there are other obstacles in the way, such as vents, and there is even less room in the bedroom--especially with the 2 tanks in there.] I'll just dream for now. |
|
|
|
Post by Carl on Mar 14, 2015 11:51:28 GMT -5
These are not really complicated devices, but it is the subtle issues that can make for a better FSB Filter. I would agree with Devon based on my experience using many different versions/brands. The most common problem is sand backing up into the intake tube followed by poor fluidiation. Some brands had major issues with both aspects, those being the Merlin & Coralife. The Lifeguard improved upon these issues considerably (mostly it improved upon the Fluidation issue), but still often suffered often from the sand backing up into the intake tube. Flow is certainly part of the problem, but have a good way to spread the sand with a plate with many holes in it as the LifeGuard has or by how water enters the device along with pebbles at the bottom as the TMC FSB filter does. Preventing back up, especially when disconnecting for service is a major part of preventing back up. Check valves can help with this. This problem persisted with the Lifeguard, but is not as common with the TMC. Consistent Fluidation has been improved with both the Lifeguard and TMC models, but it is still an area that can be improved on IMO. this article might be helpful: aap.atrixnet.com/?p=375Carl |
|
|
|
Post by devonjohnsgard on Mar 14, 2015 11:52:59 GMT -5
The outtake not sucking up sand I think will be the most challenging part. Correct me if I'm wrong, but isn't that more a function of flow than anything? Too little flow = no fluidization. Too much flow = sand blowing out the top? With either a variable speed pump, or a ball valve to control flow, I'm thinking that should be able to be kept under control? More flow is needed to start the sand turning, but after the filter starts to "fluidized", which you will see when it happens, the flow can be adjusted down to keep the fluidizing sand in between a min and max line. I know some designs of sand filters have a way of making more of a gentle flow (a more spread out flow) instead of a directional flow from water coming in from one single direction. They do this by having the flow come from button and through little pebbles. The outtake is on the top. You also have to think about back flow is the system ever loses power. I'm toying with design ideas for an internal FSB - which obviously doesn't need to be watertight - just has to keep fish out. Or a closed version for external use. Acrylic tubes are stupid expensive, so my current thought process is to use a straight sided vase. These are available in all sizes at ridiculously cheap prices. I'm thinking either 4" OD or 6" OD. I've never done this. |
|
|
|
Post by sdboers on Mar 21, 2015 8:34:24 GMT -5
I declare this project a success. This has been running flawlessly for about 2 weeks now. All of the components are working well (with the exception of the changes I need to make to the vacuum). The tank water looks great and all my water parameters are looking good. Nitrate - which is the only level I ever used to fight with is down around 20ppm. Given the quantity and size of cichlids I have - I generally have a lot of crud floating around in the water. The powerheads with filter floss keep that well under control and I'm generally quite happy with the appearance of the tank. This project has really slimmed down on the amount of aquarium maintenance. Happy happy joy joy... Sean. |
|
|
|
Post by Carl on Mar 21, 2015 10:57:11 GMT -5
Great! Yours was more complicated too since you had your aquarium below where gravity could simply remove your water to the sewer or septic lines, but you over came this nicely! Carl |
|